
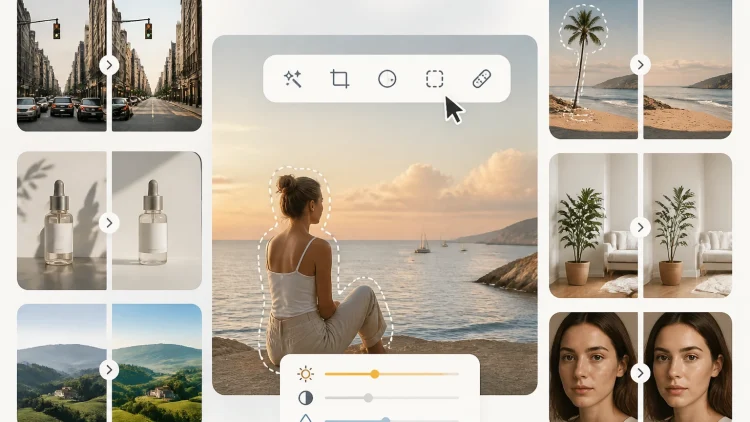
You need great photos to sell products or build a personal brand. High-quality images tell customers that you are professional and trustworthy. In the past, that meant hiring a photographer or spending years learning complex editing software, which was slow and expensive. Now, you can use an AI Photo Studio to get similar results in just a few minutes. These tools handle the difficult parts of editing so you can focus on your business.
Most people struggle with lighting and backgrounds when they shoot their own photos. You might have a great product, but a messy room behind it makes it look cheap. A smart AI Image Editor can fix this by identifying the subject and cleaning up the rest. You do not need to be a tech expert, because the software handles the masking and blending for you.
These tools are also much faster than traditional methods. You can process dozens of images in the time it used to take to edit one, which means your products go online sooner. This guide shows you how to use AI photo tools to speed up your workflow without sacrificing quality.
- ⚡Edit dozens of photos in minutes
- 🧹Remove messy backgrounds automatically
- 💡Fix dull lighting and colors
- 🔍Upscale small or grainy images
Step-by-step guide to professional AI photos
- 1Choose
- 2Upload
- 3Remove background
- 4Adjust light
- 5Upscale
- 6Review & export
Step 1: Choose your source image
Start with a clear photo. You do not need a professional camera, but a modern smartphone helps. Make sure the subject is in focus and well lit. AI tools work best when they can clearly see the edges of the object or person, so avoid blurry shots or subjects that blend into the background.
Step 2: Upload to the platform
Open your chosen tool and upload your file. Most platforms let you drag and drop images straight into the browser. If you have many photos, look for a batch upload feature so you can apply the same settings to a whole group at once. This is a huge time saver for e-commerce sellers with hundreds of items to list.
Step 3: Remove the background
This is where the magic happens. Select the background removal tool, and the AI will separate the subject from the clutter behind it. You can leave the background transparent or replace it. A clean white background is standard for most online stores, but lifestyle scenes can make your photos more engaging.
Step 4: Adjust lighting and color
Even a good photo can look dull. Use the AI enhancement tools to balance exposure and boost colors. The software can detect when a face is too dark or colors look washed out, then apply corrections that look natural rather than filtered. Aim for realistic, not heavy social media filter.
Step 5: Upscale for quality
If your original photo is small or grainy, use an upscaling feature. It adds pixels without making the image blurry, which is useful for large banners or print materials. High-resolution images look sharper on modern screens and give your brand a premium feel.
Step 6: Final review and export
Check the edges of your subject to make sure the AI did a clean job. Small errors can usually be fixed quickly with a manual brush. Once you are happy, export the file in the format you need.
- PNGBest for transparent backgrounds, logos, and cut-out products.
- JPEGBest for standard web use thanks to its smaller file size.
Tips and best practices
A few simple habits help the AI read your photos better and give you cleaner results every time.
- ☀️ Use natural lightPlace your subject near a window. Soft, even light makes it easier for the software to separate parts of the image. Harsh shadows across the subject can confuse background removal.
- 🎯 Keep your subject centeredYou can crop later, but a centered subject helps the AI focus on what matters. For portraits, tidy up loose hair, since fine strands are the hardest part for any editing tool.
- 🎨 Stay consistentStick with one background color and lighting style across your product shots. A cohesive look on your website or social feed is a key part of professional branding.
Common mistakes to avoid
- ✕Over-editing your photosPushing every slider to the max makes images look fake. Customers want to see what the product really looks like, and overly bright colors or plastic-smooth skin can feel dishonest.
- ✕Starting with low-quality imagesAI is powerful, but it cannot create detail that was never there. A very blurry or pixelated photo will still look poor after editing.
- ✕Ignoring shadowsAfter replacing a background, the subject can look like it is floating. Good AI tools let you add a drop shadow or reflection so it sits naturally in the new scene.
- ✕Forgetting file sizeHuge images slow down your website, frustrate visitors, and hurt your search rankings. Always compress images before uploading.
Conclusion
AI tools have changed the way we handle product and brand photography. You no longer need a big budget or years of training to create beautiful images. With an AI photo studio, you can produce professional content in a fraction of the time, which levels the playing field for small businesses and creators.
- ✅ Start with a clear, well-lit photo
- ✅ Let the AI handle background removal, lighting, and upscaling
- ✅ Do a final check on edges and shadows
- ✅ Export in the right format and compress before uploading
As you get more comfortable with these tools, you will find new ways to make your brand stand out. The speed and quality of modern AI editing make it an essential part of any marketing strategy.
Artikel Bermanfaat dan Menghibur Lainnya




Tim Dalam Artikel Ini

Bisa diajak diskusi panjang lebar tentang kehidupan asal ada segelas kopi di atas meja. Mengubah kafein menjadi inspirasi, lalu merangkainya menjadi cerita. Percaya bahwa ide-ide terbaik selalu datang dari hal-hal yang paling sederhana.